Birth of a Room (By Matthew Cramp)
Being told things to remember is all well and good, but I'm sure many would-be architects have encountered exactly the same problem as I have in the past - looking at the 38 by 32 grid and thinking, "Now what?", and just plunking some monsters down in the end and calling it a hold. That's not going to immortalise you in the Hall of Architects, now is it? And it just doesn't feel satisfying, to build or play.
No, what you need to do is make a lynchpin room. A room with a key, a certain set of actions that end up making the room work. The more keys you put in, the harder it is to solve the room, and the better you hide them, the more difficult it is. The best way, I've found, to build a really satisfying lynchpin room is to come up with a script for exactly what you want the players to do, then make the room fit the script as much as possible. (Of course, I pretty much stole this off Erik, so I can't really lay claim to it. But it's true.)
In April of 2004, we ran a contest in which architects were given a koan from the I Ching and asked to build a room around it. The cunning thing about this is that, essentially, you're being given the script, so all we need to do is build the room. And that's what we're doing here today.
Here's the koan we're working with:
* * * THE JUDGMENT * * *
The Wanderer. Success through smallness.
Perseverance brings good fortune
To the wanderer.
* * * THE IMAGE * * *
Fire on the mountain:
The image of the Wanderer.
Thus the superior man
Is clear-minded and cautious
In imposing penalties,
And protracts no lawsuits.
So, where to begin? The first section suggests that this room will be a war of attrition, possibly involving lots of roach queens or tar, or, alternatively, a room requiring a lot of orb-banging. The second section suggests the shape of the room - a mountain, maybe even with snakes at the top to symbolise fire. We might be able to get the snakes and the other elements to interact. The real riddle is in the last sentence - the room will change depending on whether this is addressed to us, the architects, or to the triumphant player. If we read it as being us, it probably rules out orb-banging, and if we read it as being a player, it means that the player shouldn't 'punish', say, the tar mothers, until sure that's what they want. There is a room in Dugan's that does this with tar, but we're going to add snakes and the mountain and see what happens.
Groundwork
I'm going to do all my work in DROD:AE so I can show you how it comes along. I have a grid pad about the size of a DROD room that I use occasionally, but it doesn't look nearly as cool, and I don't have a scanner handy.
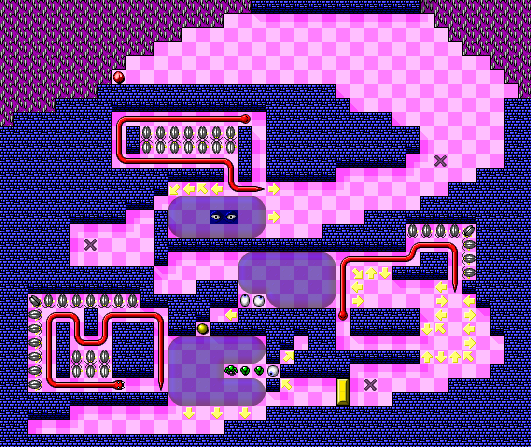
Now we know our script (Beethro works his way up the 'mountain', blocked by tar mothers and with snakes doing endless loops around the place) it's time to build the room. (I'm building it in catacombs because I like the Webfoot catacombs music, but I'll switch to ice come playtesting.)
I tend to work out what the room will look like first, which way I want Beethro to go, and leave the minutiae of what puzzles I'm putting in his path until later. I want Beethro to go up, so the snakes are at the top of the room guarding the green door. The tar's in the middle. I want to use left and right movement as much as possible, not only because it's a good approximation of weaving your way up a mountain, but also because I have more room that way.
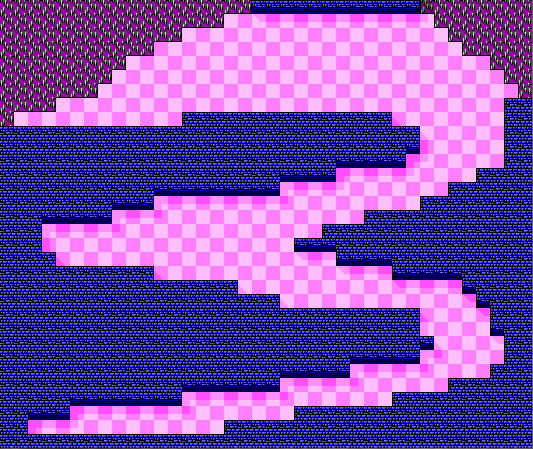
Here, I've put down the corridor I want Beethro to move along. I've got a space for the snakes, as well. As I add puzzle, fresh baked out of the oven, this will mutate into the final room.
Now for the tar mothers. I want to force Beethro to keep the tar mothers alive, so a lot of the planning will be making sure that happens. The only reason you'd want to keep tar mothers alive is to make sure the tar grows back. We can enforce it using the snakes, and any tar babies that get formed can be drained out of the area and sent Beethro's way.
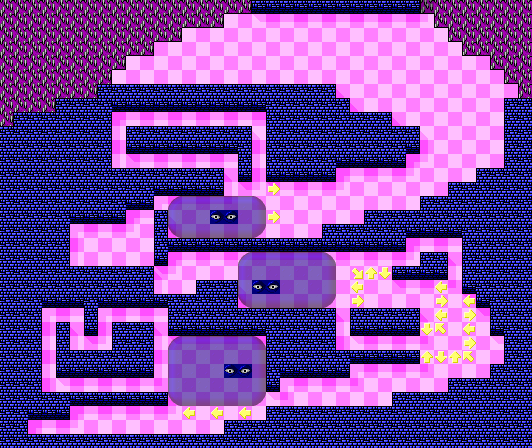
Here you can see the tar mothers in place, as well as some runs for the snakes to go. There's exactly thirty squares in each run, which means that the snakes will be in the same place each spawn cycle. Useful, as we can use this to ensure that if the player successfully turns each snake, the tar won't grow.
It's at this point that I finally remember that tar mothers will make all the tar in the room grow, not just the stuff it's buried in. This causes problems, as you can pretty much butcher the first two sections so long as the third tar mother's growing.
When building a normal room, often the best idea is to take a room that's grown other than you intended and use the new idea, and make another room using your old idea; essentially, you treat it as a happy accident. However, here, we're bound by specifications - and besides, my koan says that perseverance will bring good fortune. So let's persevere.
I mentioned earlier that we could use roach queens or tar mothers, and went with tar mothers somewhat arbitrarily. So, now, let's add roach queens into the mix.
There's some nice big spaces where the snakes are, so let's fill those up with roach mothers. On spawn, the snakes will fully cover these up. And where the first two tar mothers are, we'll put a place for an enemy such that if Beethro goes into that area, he'll have to kill the monster, and thus leave a space for a tar baby to spawn in. This preserves our original idea - leaving enemies alive as long as necessary. (You can see I've made a place for a brain, except now I think I don't want people to have to work so hard to get to it.)
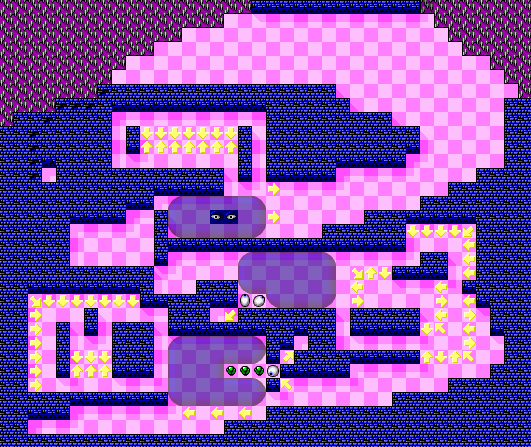
Now for placing enemies. The room starts just after spawn, so the snakes have to cover up both the tar and the mothers, which reveals a few flaws that are going to come and bite us.
Firstly, the bottom section no longer works. Simple - we add an orb and door combination. We may have problems in the top section with not giving it a chance to drain. But we shall see in playtesting. I'll also slap down some checkpoints in obvious places, but these will change as we playtest. Here is the room as it stands, as we begin:
Playtesting
The most critical stage of room design. Playtesting reveals weaknesses in your design and enemy placement, it shows you just where you'd want a checkpoint, and it will show you just what you need to do to make your point. In short, playtesting shows you what your room's like to play, so you can tweak it to perfection.
Let's begin.
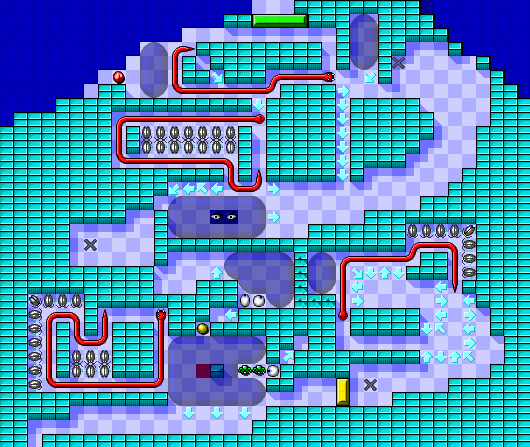
Playtesting reveals a few weaknesses already:
* The snakes aren't placed right to stop spawning - I'll have to move them along one.
* I haven't accounted for removing the tar mothers properly, so I'll have to remove a goblin. As this makes things easy, I'll add a trapdoor in a very inconvenient place.
* Evil eyes apparently see through tar. I'll have to rotate the thing.
* I'm an idiot - the arrows for the roach mothers are the wrong way, and will release them.
* The second part isn't doable as intended, but on the other hand it creates an interesting race against time as you have to get to the third tar mother. Again, although I'd leave it, we've got a spec to fulfill. It'll have to change. That, and it ruins the third part of the room, which is getting past the tar mother.
* There's a two-tile wide passage right next to tar. Whoops. Stick an arrow in there so it can't close that passage up.
* There's still no incentive to keep the top mother alive.
This last one is a bit of a failing - it's not interesting, and it's not fun to just kill the queen. Let's raise the stakes and make some fire.
Repair Work
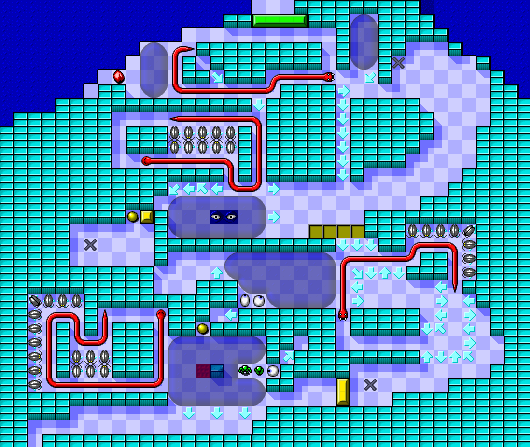
Keeping with the snake/tar theme, let's get some tar that's blocked by snakes on spawn. However, keeping in mind one of the problems of playtesting, namely something spawning in front of the snake, let's try something different - here, we have to get the tar to spawn a tar baby, which will shunt the snake on the right path, away from Beethro.
We have to ensure that the snake is being forced away from where it would go given the choice - so we're forcing the snake north, as this'll be okay until Beethro has to deal with the snake. Once the brain's dead, Beethro can use the area behind it to kill the snake as well.
One of the cardinals rules of DROD room design is to not make rooms that rely on the order that monsters move. We can't guarantee if the tar baby will spawn before the snake, so we'll have to spawn the tar baby in the proper place and force him to wait until the snake moves on. So let's spawn two, have them follow one another, and have the snake come along as they're moving into position.

Now for the second section. The original idea was to have the tar grow back before the snake got to it, but that doesn't leave us any way to get to the tar (as the snake needs to block its growth), so we're going to have to change the idea.
A key part of this section is that want to keep the queens from spawning, so if the snake dies we want to put the player in a position where their flank is exposed. This suggests we need a time-consuming part on the left, and we want to keep the entrance open once it's made.
Thus, what we'll do is add some crumbly walls instead of tar, and extend the tar so that Beethro has to wait for the tar to grow back if he's been a bit careless. As it stands, Beethro already has to clear the tar in this section (as otherwise it will grow and spawn into an unreachable area) so let's keep that element in. We want to keep some tar, but Beethro will be able to clear it fairly quickly, and we'll put some crumbly walls in. If the snake's patterns get interrupted, Beethro will have a problem come tar-clearing time. Hopefully.
More Playtesting
Back to playtesting, to see what our changes have done. The new snake works well, although a tar baby gets stuck in the corner when tackling the second section. We'll add another column of arrows for that. Also, the trapdoor changes the first section rather a bit, to force the player to either take the goblins or remove the tar. Both are interesting options, but I want the player to be prudent. I'll rotate the eyeball, but to stop the eyeball from activating when you pass it, I'll drop in a crumbly wall. (It's also a hint to the watchful player that not all is as it seems, although while playing you actually see the crumbly wall under the tar.) You can see both changes above.
As for the second area changes, unfortunately, they don't seem to work, making the section easier than it probably should be. I'll have to reverse it, keeping it a race against time. The changes made to the tar mother keep the area somewhat interesting, but there are some things in room design that you can't always nail.
Speaking of the tar mother, as I playtest the third area, I notice that the snake needs to be shortened; the reason being that the tar babies don't have a chance to get through (Now there's an extra two coming down, they tend to pile up quick). I might fix that by adding an arrow or something so they can drain down into the second section, but that will cause problems with the snake, although playtesting reveals no real problems so long as I put in a second arrow. Also, I'll reduce the number or roach queens in there to shorten the snake.
And the snake/tar section up the top has broken, the reason being that the snake dies instead of escaping. There doesn't seem to be any element that snakes can cross that tar won't spawn on, and removing a wall seems to cause problems. However, playtesting reveals that it still works if I remove a wall - the tar babies drain off a different way, so the snake stays alive.
The Finished Room
And there it is. A room, and a stonking hard one too - the second section in particular is quite nasty with the introduction of those arrows. It's a good illustration of two things - a recurring bug where brains can't work out force arrows until they've been passed over once [This issue only applies if played in DROD:AE - Ed], and that what makes things difficult in DROD is having enemies coming at you from multiple directions. Beethro can get pincered quite nastily in the middle of the second part.
If you want to play the room for yourself, you can download it below. You can piece together what to do from the article, but it does require a good deal of skill at swordplay, so be warned. (I couldn't do it all together, although I did manage each section seperately. This is naughty, I know.)
Matthew Cramp, both former webmaster and the creator of some very memorable rooms in DROD: Journey to Rooted Hold, is a very active member of the DROD community.